
There is an introduction to the concept of lists available in the Developer Guide.
Lists
When creating or editing a list, you can compare field values with values supplied by you. As the list is processed, an element (e.g. an account) becomes part of the list only if all comparisons (filter criteria) apply.
If a list does not have any filter criteria, all elements are included as the list is computed.
Several groups of filter criteria can be created. With more than one group, an element is added to the list if the criteria of at least one group are met for this element. The criteria in the screenshot below will select all persons who accept emails and have a monthly subscription to Business News (first criteria group), or accept emails and are a sales person (additional criteria group).
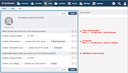
Note that several comparison values can be specified by separating them with a comma. Examples:
| Expression | yields... | ||
|---|---|---|---|
| Account: Locality | is NOT blank | ...all accounts whose locality has been specified | |
| Account: Postal Code | contains the words | 98434, 15423 | ...all accounts whose postal code is 98434 or 15423 |
| Account: Postal Code | does NOT contain words that begin with | 7, 8, 9 | ...all accounts whose postal code does not start with 7, 8, or 9. |
| Account: Name | does NOT contain the words | limited | ...all accounts whose name does not contain the word limited |
| Account: Company Group | contains the words | invest | ...all accounts whose group name contains the word invest |
Furthermore, you can specify as a criterion that an element, e.g. a person, needs to be contained in a given set, a list, or a CSV file. Examples:
| Element | Condition | Comparison value(s) |
|---|---|---|
| Person | is included in | a set of individual persons |
| Account | is not contained in the list | the given list |
| Mailing recipient | is contained in CSV | uploaded CSV file |
List processing
After the list has been created, it is empty. In the next step, the contents of the list needs to be computed. For this to be done, click the corresponding link. List processing can take several minutes, depending on the amount of data and the complexity of the filter criteria involved.
After the list has been processed, it contains the entries that match the filter criteria. Note that the list will not contain duplicate entries even if identical entries are added more than once to it.
All lists can be viewed as tables, or downloaded as CSV or XLSX files.
Lists are not updated automatically. Therefore, if required, a list should be recomputed before it is used.
Example: Who clicked a link in a mailing?
With mailings, the emails sent may contain any number of tracked links. Wouldn't it be nice to be able to extract all those mailing recipients who clicked a link, or all those whose email couldn't be delivered?
This can be easily achieved by means of a recipient list. So, first open the Lists section of the WebCRM, then click New List:
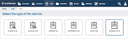
Since you are going to create a recipient list, select this list type. A form for specifying the list criteria is displayed. No filter criterion has been specified yet, so click the plus button to define one. Initially, there is one default filter criterion, Recipient: ID is NOT blank:
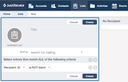
Now, there are three things that need to be done. Firstly, the mailing for which the list should be created needs to be specified. Secondly, the list itself requires a title. For better remembering later on what the list is for, it is recommendable to reuse the mailing title and extend it accordingly. Thirdly, specify the desired filter criterion (or criteria) to restrict the resulting list to the recipients you wish to find. On the screenshot below, these three items (mailing, title, and filter criterion) have been provided:
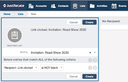
Note that you could also have specified a date and time before, at, or after which a link in the emails must have been clicked for the filter to select a particular recipient. You can also select recipients who have not clicked a link by requiring the click date and time to be empty (is blank instead of is NOT blank).
Choose Recipient: Bounce Date is NOT blank to select recipients to whom the email couldn't be delivered.
After these basic list properties have been set, click Create to store the new list:
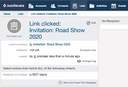
To finally apply the filter criteria to the recipients of the selected mailing, click Compute now. You can change the list properties anytime and recompute the list as often as you require to do so.
After computing a list, the number of matching elements (in this case a subset of the recipients of a particular mailing) is displayed to the right of the list overview:
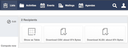
You can now use one of the options to have the result displayed, or to download the data as a file in a common format.
To use a mailing recipient list for specifying the recipients of any mailing that has not been delivered yet, create a contact list, and use the recipient list as a filter criterion: Contact: ID is contained in the list …