Using the Scrivito Mailing Editor

The email content of a mailing can be composed using either the classic text editors for the HTML markup and the plain-text versions, or the Scrivito Mailing Editor.

The Scrivito Mailing Editor is based on our Scrivito CMS which has been integrated into the WebCRM. It lets you edit your mailing content in a more visual and intuitive manner using advanced yet easy to master techniques such as widgets, drag and drop, and in-place editing. See scrivito.com for the full benefits.
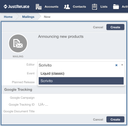
When creating a mailing, you can select the editor to use unless the Scrivito Mailing Editor has not yet been enabled in your WebCRM. In this case, please contact our support team. We'll be happy to activate Scrivito for you.

After creating a mailing, the steps to be taken are almost the same as for a mailing using the classic text editors: you can and should specify the mailing header fields and the parameters for Google link tracking (if applicable), compose the content, add deliveries, test the mailing and have it delivered.

However, in conjunction with the Scrivito editor, a couple of mailing aspects are approached differently for increased comfort and flexibility:

  • Link tracking is always on. There is no need (it isn't even possible) to manually insert tracked links into the mailing content. The WebCRM automatically extends all links by the parameters that make them trackable. This also applies to Google link tracking if Google tracking parameters have been specified for a mailing.
  • Email opens are always tracked. On delivery, the WebCRM automatically inserts the tracking image URL into the emails. There is no need to do this manually.
  • Scrivito mailings can be personalized using variables. Mailing-specific custom fields and variables are easier to handle than Liquid templates in text-based mailing content. How variables work is explained below.
  • For offering your recipients a means to unsubscribe from mailings or to manage their subscriptions, special links pointing to /unsubscribe or /edit_subscriptions, respectively, can be inserted into the mailing content.

Editing the Mailing Content

After creating a mailing, its properties and its content are displayed. New mailings come with sample content, but you might as well use an existing mailing as a template for the new one.

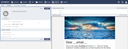
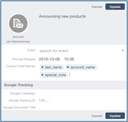
The screenshot above anticipates the below explanations of how to use variables. As you can see, variables can be inserted into the content by enclosing their name in double underscores like with __email__, which references the recipient email address.

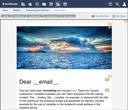
Now, if you click the Edit Content button above the mailing content, you'll see the Scrivito editing interface with its green and orange handles and frames, the latter showing up and vanishing as you move the mouse pointer over the content.

The handles and frames indicate widgets, which are page components you can place anywhere on the page. You can grab a widget by its handle, drag it somewhere else on the page, and drop it there. VoilĂ , you've rearranged your content! Widgets with orange handles and frames are container widgets to which content widgets (the green ones) can be added.

There are several widget types available for placing different kinds of content onto the page, e.g. the Image widget, the Headline widget, or the Text widget. Clicking the handle of a widget opens its menu which includes items for duplicating, copying or pasting, or deleting the widget. Some widgets have properties that can be accessed using the corresponding widget menu item. The Row widget, for example, lets you specify the number of columns the row should have. For each column, its width can be specified for large and small devices. Additionally, you can specify a background image and an additional CSS class to be applied to the row. Widgets of all types are equipped with this Additional CSS class field on their properties dialog.

Mailings composed using the Scrivito Mailing Editor are built upon the Foundation CSS framework for emails. This is why the content of every mailing is made up of one or more Container widgets each of which may contain any number of Row Widgets to which any combination of content widgets can be added.

Some words on the provided widget types

Most of the widget types the Scrivito Mailing Editor provides are self-explanatory. The Headline widget, for example, lets you specify the headline level on its properties dialog. However, there are two widget types that should be looked at more thoroughly, the Image widget and the Filter widget.

Image widgets

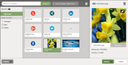
To specify the image an Image widget should display, just drag the image from your desktop or file browser onto the widget and drop it there. You can also click inside the image widget to open the Content Browser built into the Scrivito Mailing Editor for uploading images and selecting the one to use.

The Content Browser lets you upload images to the Scrivito CMS using drag and drop. Giving your image files meaningful names makes it easier to find them later on using the built-in search.

The Content Browser serves to maintain the images of all your mailings, not just the one whose content is being composed. On delivery, the images part of the content of a mailing are copied to a safe place to have them available even after they have been deleted from the Scrivito CMS.

Filter widgets

Filters free you from having to create several almost identical mailings for addressing only slightly different target groups.

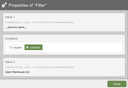
The Filter widget lets you conditionally include content in your mailings. If, for example, you wish to make a special offer to the recipients working for a specific company, you could define that the recipient's account name needs to be equal to the name specified in the filter.

Note that the comparisons filters make are case sensitive and that equals yields true only if the values compared are identical.

Many and varied use cases for filters are imaginable: Deliver content only to those email addresses that are subscribed to a specific mailing topic, or whose owners live or work in a specific country or region, etc. Please thoroughly test mailings in which filters are used to ensure that they are applied as intended.

Using variables

As indicated above, you can personalize a mailing by using variables in its content. There are four built-in variables:

__email__ The email address of the recipient
__mailing_id__ The ID of the mailing
__mailing_title__ The title of the mailing
__topic_names__ The mailing topics the recipient subscribed to

There are many more values available that can be used as variables, however, they need to be declared as Custom Field Names in the mailing properties first:

The individual values of the built-in variables and the Custom Field Names are determined in the very moment in which deliveries are added to the mailing. So, adding a custom field to a mailing requires the existing deliveries to be removed and added again. Hence, it's best to complete the mailing content and to declare all the fields prior to adding deliveries.

Specifying and using custom fields

You can use all predefined contact person fields plus the custom fields as variables. So, for example, after declaring last_name as a custom field name, __last_name__ yields the last name of the contact person acting as a recipient. Additionally, you can access a contact person's account fields using account_ as a prefix as in __account_name__.

Template names can be used as variables, too. If, for example, you have a salutation Liquid template for addressing recipients based on their gender or other criteria, just add it to the Custom Field Names of the mailing. Then insert __salutation__ into the mailing content to have this variable replaced with the contact-specific template evaluation result.


Template names take precedence over field names. If there is a template named status as well as an equally named contact person field, the result of the template evaluation is used, not the field value.


Last but not least, you can define Custom Field Names not referring to any template or field name at all. The values of such fields are meant to be edited individually for each delivery. This is a convenient way to address recipients personally; take a look at the special_note field on the screenshot below.

Editing custom field values

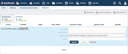
The values of all the custom fields the individual deliveries have can be edited. To do this, click All deliveries in the mailing overview (if deliveries aren't already being displayed), then click the pen icon at the leftmost position of a delivery. This opens a form for setting or changing the field values of this delivery (or deleting it, if required):

Again, please test your mailing using an appropriate number of contact persons as data sources, especially if your mailing content includes filter widgets. Finally, get ready to deliver the mailing.